Pages

Tuesday 5 November 2019

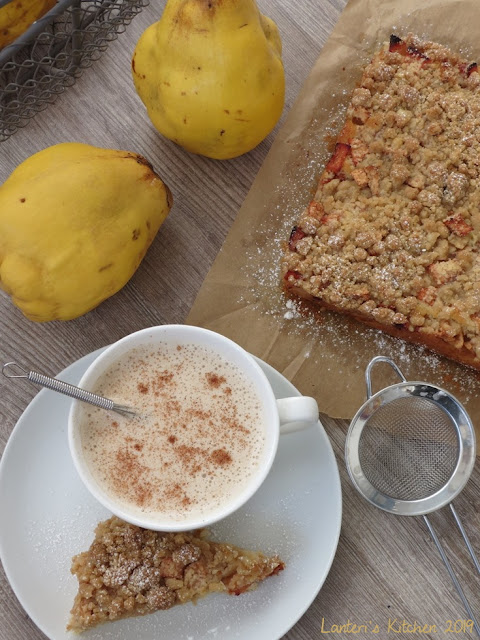
Quince Crumb Cake - Gâteau Crumble aux Coings


This has been a favorite recipe for a few years now and it's about time I share it with you. It's fruity and crunchy and feels extra indulgent (although  the total quantities of flour, sugar and butter are those of a regular cake).
I used quinces from the garden and a couple of apples for this cake but you could substitute for apples or even pears.

Quince Crumb Cake ( adapted from a recipe by Martha Stewart)

Crumb topping:
50g melted butter
100g light brown sugar
100g plain flour

Cake:
150g butter
150g icing sugar
3 eggs
1 tsp vanilla extract
150g self raising flour
a few tablespoons of milk

500g quinces/apples peeled and cut in small pieces (prep them last, they brown quickly)
1 or 2tsp ground cinnamon or other spices

For the crumb topping:
Once the melted butter has cooled a little, mix it with the brown sugar and flour with the tip of your fingers. Keep the crumbs in the fridge until needed.

For the cake:
Cream the butter and icing sugar. Add the eggs and vanilla, then the flour. Loosen up the batter with a splash of milk (3 or 4 tablespoons should do it).

For the fruits:
Simply toss the spices into the pieces of fruits.

Spread the cake batter in a prepared pan (I use a rectangular traybake tin). Then add the fruits and finally the crumbs. If some pieces are too big, simply crumble them between your fingers.

Bake 45-50min at 160°C fan.
Sprinkle with icing sugar before serving.


Une de mes recettes préférées depuis quelques années, il était temps que je la partage ici. Entre son goût fruité et son topping croquant, ce gâteau a tout pour plaire (et en bonus, les quantités de farine, beurre et sucre sont similaires à un gâteau tout simple). 
Ici, j'ai untilisé des coings du jardin et des pommes mais ce serait aussi délicieux rien qu'avec des pommes ou même des poires.

Gâteau Crumble aux Coings ( adapté d'une recette de Martha Stewart)

Topping:
50g beurre fondu 
100g sucre - vergeoise blonde
100g farine

Gâteau:
150g beurre
150g sucre glace
3 oeufs
1 cc extrait de vanille
150g farine avec levure incorporée
quelques cs de lait

500g coings/pommes, pelés et coupés en petits morceaux (à préparer en dernier parce que ça noircit vite!)
1-2cc cannelle en poudre ou autres épices

Pour le topping: 
Quand le beurre fondu a un peu refroidi, le mélanger au sucre et à la farine du bout des doigts. Mettre le crumble au frigo.

Pour le gâteau:
Blanchir le beurre et le sucre glace. Ajouter les oeufs et la vanille, puis la farine. Assouplir un peu la pâte avec quelques cuillérées de lait (3-4 cs).

Pour les fruits:
Mélanger les épices aux morceaux de fruits.

Etaler la pâte à gâteau dans un moule (j'utilise un moule rectangulaire). Ajouter les fruits et pour terminer le crumble. Si certains morceaux sont trop gros, les effriter entre les doigts.

Cuire 45-50min à 160°C chaleur tournante.
Soupoudrer de sucre glace juste avant de servir.


Thursday 19 September 2019

Lego Ninjago Cake


J has been a Lego fan for years so logically he got into the Ninjago story. When I heard Ninjago cake, I thought "I've got this, yellow cake with red draped bands on top with back eyes, sorted!". That's when hes started describing his cake "the temple with Master Wu on top and bla bla bla..." to be honest I freaked at temple! Gone were my dreams of a quick and easy cake...


After a lot of avoiding thinking about it (it was way too hot!), I only had a week ahead of me and no idea how I was going to pull it off. Good news is we have plenty of Ninjago figures! I just had to figure out a way to make a temple... The ones I saw online were very intricate with painted dragons etc. Not my thing, and P (aka Daddy ) wasn't keen on having the pressure of painting dragons all around the cake an hour or two before the party! Back to the temples. I ended up picking the monastery from season 1: simple lines and a lot that could be made ahead. Bingo!


I stacked some tins to get an idea of the finished size and made templates for the decorations. I mixed tylo powder to some fondant and got to work as soon as I could so they would be dry. I used half toothpicks to hold the banners in place and also put bamboo skewers behind the main gate (not sure I needed them but I wasn't going to take any chances!).


-cake: 3 x 20cm cakes, recipe from the blog Life Love and Sugar (here)
Easy recipe and it worked out well.
-Mixed berries fruit curd: 400 fruit puree, 2 1/2 Tbsp sugar, 2Tbsp cornflour, a bit of lemon juice
mix everything in a small pan then slowly heat it up to thicken, stirring constantly. let it cool down, covered
-American buttercream: 250g butter, 500g icing sugar
-sugar syrup: 60g sugar, 120g water
- fondant: 600g to cover the cake (plus extra for the board and decorations)


I really enjoyed making this cake. Taking my time to come up with a doable design and templates really paid off and it looked amazing! (even if I say so myself! :p ) In case you're wondering what to do with the figures: they shouldn't be in contact with the cake so I simply rolled a bit of fondant to act as a barrier. Before slicing the cake, simply remove the figure with its little ball of fondant and it's all good.


The big empty space on the top was for the candles, J needed 7 this year!


Noddy Cake


I have been avoiding writing about this cake... I love the result but gosh it caused me a lot of stress and tears!
Let's start at the beginning: E wanted a Noddy cake. He had been watching Noddy Detective and wanted it all on his cake! I said I would do my bestest best and was hoping to find little toys I could put on top. Unfortunately I couldn't find anything suitable... here comes the stress! It's one thing to make a ball out of fondant, something else entirely to make a character! All considered Noddy doesn't look too bad, I made sure to take photos of his best angle! haha!
As usual I made the decorations a few days ahead, adding tylo powder to the fondant.That's when I made the stamp for the footprints. 


cakes:  double zebra cake recipe (need to find another one more reliable!) 3 x 20cm cakes
chocolate ganache: 600g best baking chocolate you can afford, 600g double cream  (it was way too much but I'm not sure half would be enough...)
sugar syrup: 60g sugar, 120g water. use cold on the cakes when assembling
fondant: 600g to cover the cake, extra for the board and decorations


The big fiasco was the baking of the cake. I can't seem to get the zebra cake to bake properly in smaller sized tins. It looks and feels baked but actually the centre isn't... here come the tears! Thankfully my very grown up 6 year old told me I was going to find a solution and it would look great! I gave him a big cuddle, dried up my crocodile tears and got thinking. You see the sweets/open top with the scissors etc? I used a round cookie cutter to remove the slightly underbaked centre and it all went smoothly after that!


I left the cake in the fridge overnight uncovered and took it out a couple of hours before the party to add the decorations and fill with sweets! E was very excited and J was very proud he helped avoid a fiasco! :o)


More photos? Of course!


Monday 31 December 2018

Super 4 Playmobil Cake


Zebra cake recipe (add lemon zest)
filling : blueberry curd and lemon curd
american buttercream under the fondant

cake iced the night before and left in the fridge overnight.
it is shiny on the pictures because I'd just taken it out of the fridge (don't touch the fondant at that stage, it will go back to normal when the temperature settles) 


Saturday 18 August 2018

Flamingo Summer time Cookies


When J asked me to make biscuits to take to school as a thank you, I couldn't refuse... 2 days later, they were ready. It was really fun: 4 icing colours, simple shapes, great impact!

We had fun sketching them together. I've been sketching my biscuits for a while and although I'm far from being an artist, it helps me to narrow down what cookie cutters to use and what colours to mix.

The chocolate biscuit recipe can be found here


J and E were really proud to take them to school and nursery and the biscuits went down well with the staff. Brownie points all round! :p


Wednesday 11 April 2018

McQueen Cake


E just turned three! He's a biiiig Cars fan so I knew I had a challenge...
This cake was a real team effort: J (big brother, 5) helped with the design, giving ideas of details to include and P (aka Daddy) painted the all important eyes. 
After all the Easter chocolate, I wanted something different: orange cake and rhubarb compote (the last of last year's harvest...). I know it's an unusual choice, especially for kids but the boys love rhubarb!

It was done over three days and I didn't have much sleep but when I saw my little ones' faces, it was all worth it!


Day -2, evening: make details with fondant mixed with Tylo powder so they would be dry and hard on the day. (to get an idea of the scale, I piled up the cake tins I wanted to use)
side note: I've definitely reached my max modelling ability on this one!
                           defrost rhubarb compote
                           prepare cake board

Day -1, morning: bake cakes (I used the zebra cake recipe with orange zests), reheat rhubarb compote and thicken it a little, prepare American buttercream and syrup 


Day -1, evening: level cakes, brush syrup on top then layer with rhubarb compote (and a buttercream dam) and crumb coat. Leave the cake in the fridge for a while.
                           cover the cake in fondant and make the eye panel and the headlights (I actually had to do the panel twice to look right)
                           place in the fridge overnight uncovered


D day: get the cake out of the fridge at least an hour before final decorating (the fondant sweats while it gets to room temperature and it's important not to touch it!) 
           colour the buttercream
           ask Wonderful Husband to paint the eyes and headlights (colouring paste and vodka to dilute)
           put it all together and keep fingers crossed!


Verdict? Yum! The cake was moist and well balanced and everybody loved it. Winner!

A few detail shots? Of course! (look at those eyes!!!! very proud wife :p )


Monday 12 February 2018

Chocolate Biscuits Recipe - Recette des Biscuits au Chocolat


A few years ago, I went on a mad search for my ultimate chocolate recipe and I never got around to posting it... Let's change that: here it is!

Chocolate Biscuits (adapted from Lilaloa)

Ingredients for a generous batch:
250g butter (straight from the fridge)
250g caster sugar
1 tsp salt
2 eggs
1tsp vanilla extract
375g plain flour
60g cocoa powder (the nice baking kind, not the hot chocolate one!)

I try to prepare the dough several hours before baking (even the day before).

In a food processor, mix sugar, butter and salt.
Add the eggs and the vanilla. Mix until combined.

Sift flour and cocoa in a big bowl. Add the previous mixture and work with your hands trying to keep it crumbly (you don't want to knead the dough). When the flour is incorporated, press the dough into a ball and cut it in half.

Roll the dough to pencil thickness. I like to use cling film to sandwich the dough and dowels or pencils as guides for the rolling pin. Repeat for the other half. Chill in the fridge until firm (ideally several hours). The rolled dough freezes very well, just wrapped with more cling film or a very big freezer bag.

Cut the biscuits and dispose them on a prepared baking tray. Place it in the fridge while the oven is preheating at 180°C (it prevents the biscuits from spreading). Cooking time will vary depending on the size of the biscuits. For even baking, put similar sizes on the same tray. It's quite tricky to know when the biscuits are done so if you have the patience, bake a few and taste when cool to find what you like (it'll be worth it!). The unbaked shapes also freeze well.
Leave the biscuits on the tray for a few minutes before moving them on a rack to cool completely. Repeat the rolling, fridge, cutting, baking, cooling process.
Store the biscuits in an airtight container.


Je ne sais pas pourquoi je n'ai jamais publié la recette de ces biscuits... ça m'avait pourtant pris de nombreux essais pour trouver THE recette comme je voulais. La voilà!

Biscuits au chocolat (adapté de Lilaloa)

Ingrédients for une bonne fournée:
250g beurre (tout juste sorti du frigo)
250g sucre en poudre 
1cc sel

1cc extrait de vanille
2 oeuf

375g farine
60g cacao en poudre (le bon pour pâtisserie, hein, pas pour les chocolats chauds!)

J'essaie toujours de préparer la pâte plusieurs heures en avance (si possible la veille).

Dans un mixer, mélanger le sucre, le sel et le beurre. 
Ajouter les oeufs et la vanille. 

Dans un grand saladier, tamiser la farine et le cacao. Ajouter le mélange précédent et travailler du bout des doigts (sans pétrir). Quand la farine est incorporée, ramasser la pâte en une boule et la couper en deux. 

Abaisser la pâte à l'épaisseur d'un crayon. Je mets la pâte entre deux longeurs de papier film et j'utilise des crayons (ou des baguettes en bois à la bonne épaisseur) comme guides pour le rouleau. Répéter pour l'autre moitié de pâte. Mettre au frigo jusqu'à ce que la pâte soit bien ferme (si possible plusieurs heures). La pâte abaissée se congèle très bien, juste enveloppée de papier film ou d'un grand sac de congélation.

Couper les biscuits et les disposer sur la plaque de cuisson. Mettre au frigo pendant que le four préchauffe à 180°C (ça évite que les biscuits s'étalent à la cuisson). Le temps de cuisson dépend de la taille des biscuits. Pour une cuisson homogène, mettre les biscuits de taille similaire sur la plaque de cuisson. Le timing est un peu délicat. Le mieux, ce serait d'en cuire quelques uns, de les laisser refroidir et les goûter pour trouver ce qui vous plait. On peut aussi congeler les formes avant cuisson. 

Laisser reposer les biscuits sur la plaque quelques minutes avant de les transposer sur une grille pour refroidir complètement. Répéter la séquence abaisse-frigo-cuisson-grille.

Les biscuits se conservent dans une boîte hermétique.